1 Creating eyebrows for BJD tutorial (Part 1) Fri Mar 16, 2012 7:24 am
silvennia
Admin
Meggilu has posted a tutorial on creating eyebrows from scratch. It's still on Part 1, but I'll update this post as soon as she posts Part 2 as well.
Hopefully I won't get into trouble for cross-posting this here
All credits to Meggilu for her awesome tutorial right here
When it comes to adding eyebrows to the 3D surface of a BJD sculpt there are many things to consider. It may seem overwhelming at first, but there are guides on the blank face that can help you start from scratch without using something like a stencil. Now, you can place an eyebrow anywhere (or not have any) on a BJD. However, this tutorial will be based on how I place eyebrows on a sculpt to get a certain mood, realism, or presence. You can use this tutorial as a guide, but it's never wrong to break some rules and experiment.
Part 1 - References
You must consider the real human face. Eyebrows are not symmetrical at all, but they do seem to be contained within a certain area. It is good to look at peoples faces as references and try copying them on paper as practice. Even if you can't draw you can even trace over an image of a persons face to help you understand the proportions. You normally cannot look at a dolls face and just know where the eyebrows go to get a certain look without consulting references.
You should also study a doll with their face blank. The 3D sculpt can give you little hints as where to place an eyebrow. Then you may be able to almost envision the eyebrow appearing on the face before you even start. Most of the time I find that the sculpts tell you how their eyebrows should be. This can be wonderful and bad at the same time. It does help with placement, but may also limit the emotion a certain sculpt can project without it looking strange. Certain sculpts will have pronounced eyebrow ridges or bumps that may restrict your placement to a certain spot. Masculine sculpts usually have this ridge, but not always.

If the eyebrows were placed off the ridge it would look a little strange. Take my first faceup for example. The original (left) looks a bit odd like his eyebrows are going to float off his face. They look more convincing in the edited version (right) because they were placed using the sculpts ridge (and other points) as a reference.

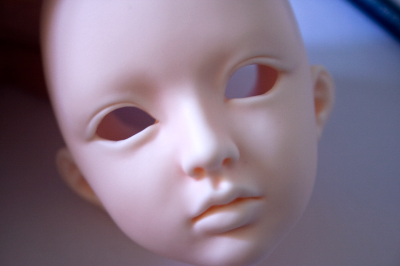
Can you see where this Supia Hael's eyebrows should end up?

Your first hint is the ridge that can be found by using the dark shadows on the upper inside of the eyes, on either side of the nose bridge. Her eyebrows will be in close proximity to this shadow, whether it be slightly above or completely covering it. When looking at these shadows it seems like she already has eyebrows. That's what I use as a guide when brushing on the first layer, or base, for the eyebrows.

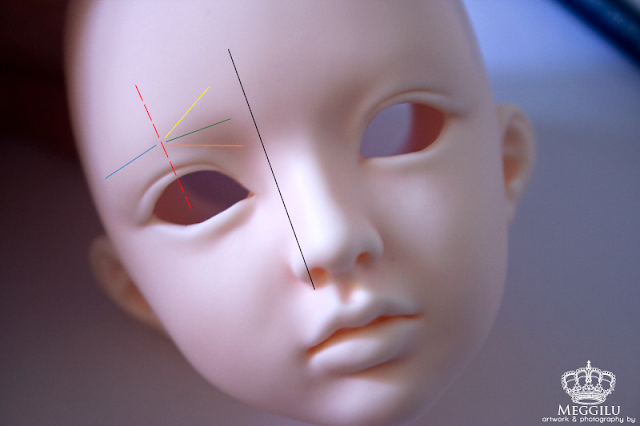
With a closer look, I can show you another guide that helps me not only place eyebrows, but also express a certain emotion.
The black line shows where an eyebrow should start. You usually don't want to go past this line, unless you'd like a more uni-brow look.
The red dotted line is the center mark where you will usually first place your brush when starting an eyebrow. This line splits the eyebrow into the expression giving inner area and the style giving outer area.
The blue line represents this "styling" outer area. You can have the eyebrow do mostly anything in this area, including not having anything at all. It can have a high arch, low arch, be straight, dotted, swirl, anything!

The yellow, green, and orange lines represent the "expressive" area.
Placing the beginning of the eyebrow;
Following the yellow line will give more of a sad, upset, or worried expression.
Following the green line will have a neutral, content, or relaxed expression.
Following the orange line will show an angered, serious, or mean expression.
Reference:

Keep in mind however, these three different emotions (neutral, sad, and angry) do not solely rely on the eyebrow position to be expressed. One must also consider the rest of the sculpts feature, especially the mouth, to successfully express a certain emotion on the sculpt.
(To be continued...)
Hopefully I won't get into trouble for cross-posting this here
All credits to Meggilu for her awesome tutorial right here
When it comes to adding eyebrows to the 3D surface of a BJD sculpt there are many things to consider. It may seem overwhelming at first, but there are guides on the blank face that can help you start from scratch without using something like a stencil. Now, you can place an eyebrow anywhere (or not have any) on a BJD. However, this tutorial will be based on how I place eyebrows on a sculpt to get a certain mood, realism, or presence. You can use this tutorial as a guide, but it's never wrong to break some rules and experiment.
Part 1 - References
You must consider the real human face. Eyebrows are not symmetrical at all, but they do seem to be contained within a certain area. It is good to look at peoples faces as references and try copying them on paper as practice. Even if you can't draw you can even trace over an image of a persons face to help you understand the proportions. You normally cannot look at a dolls face and just know where the eyebrows go to get a certain look without consulting references.
You should also study a doll with their face blank. The 3D sculpt can give you little hints as where to place an eyebrow. Then you may be able to almost envision the eyebrow appearing on the face before you even start. Most of the time I find that the sculpts tell you how their eyebrows should be. This can be wonderful and bad at the same time. It does help with placement, but may also limit the emotion a certain sculpt can project without it looking strange. Certain sculpts will have pronounced eyebrow ridges or bumps that may restrict your placement to a certain spot. Masculine sculpts usually have this ridge, but not always.

If the eyebrows were placed off the ridge it would look a little strange. Take my first faceup for example. The original (left) looks a bit odd like his eyebrows are going to float off his face. They look more convincing in the edited version (right) because they were placed using the sculpts ridge (and other points) as a reference.

Can you see where this Supia Hael's eyebrows should end up?

Your first hint is the ridge that can be found by using the dark shadows on the upper inside of the eyes, on either side of the nose bridge. Her eyebrows will be in close proximity to this shadow, whether it be slightly above or completely covering it. When looking at these shadows it seems like she already has eyebrows. That's what I use as a guide when brushing on the first layer, or base, for the eyebrows.

With a closer look, I can show you another guide that helps me not only place eyebrows, but also express a certain emotion.
The black line shows where an eyebrow should start. You usually don't want to go past this line, unless you'd like a more uni-brow look.
The red dotted line is the center mark where you will usually first place your brush when starting an eyebrow. This line splits the eyebrow into the expression giving inner area and the style giving outer area.
The blue line represents this "styling" outer area. You can have the eyebrow do mostly anything in this area, including not having anything at all. It can have a high arch, low arch, be straight, dotted, swirl, anything!

The yellow, green, and orange lines represent the "expressive" area.
Placing the beginning of the eyebrow;
Following the yellow line will give more of a sad, upset, or worried expression.
Following the green line will have a neutral, content, or relaxed expression.
Following the orange line will show an angered, serious, or mean expression.
Reference:

Keep in mind however, these three different emotions (neutral, sad, and angry) do not solely rely on the eyebrow position to be expressed. One must also consider the rest of the sculpts feature, especially the mouth, to successfully express a certain emotion on the sculpt.
(To be continued...)

 Home
Home